Van builders will tell you to lock in your lighting color temperature before you run a single wire, and there's a reason for that. LED mood lighting for a camper van isn't just about aesthetics: it's a power-budget decision, a wiring decision, and a livability decision rolled into one purchase. Get it wrong and you're either draining your battery bank faster than expected or staring at a harsh, bluish glow that makes your van feel like a break room at 11 PM.
The options split fast: warm white strips, tunable whites, RGB, and RGBW each behave differently under a 12V system. Dimmer compatibility adds another layer, because not every LED strip plays nicely with PWM dimmers, and flickering at low brightness is genuinely miserable in a small space. Color rendering index matters too, especially if you cook inside and want to actually see what you're eating.
Here's the tension most buyers don't hit until they're mid-build: the strips that look best in a YouTube walkthrough are often the ones that draw the most current, which is a real problem if you're running a modest 100Ah lithium setup. That tradeoff doesn't resolve itself, and this guide won't pretend it does.
Why Color Temperature Is the First Decision, Not the Last
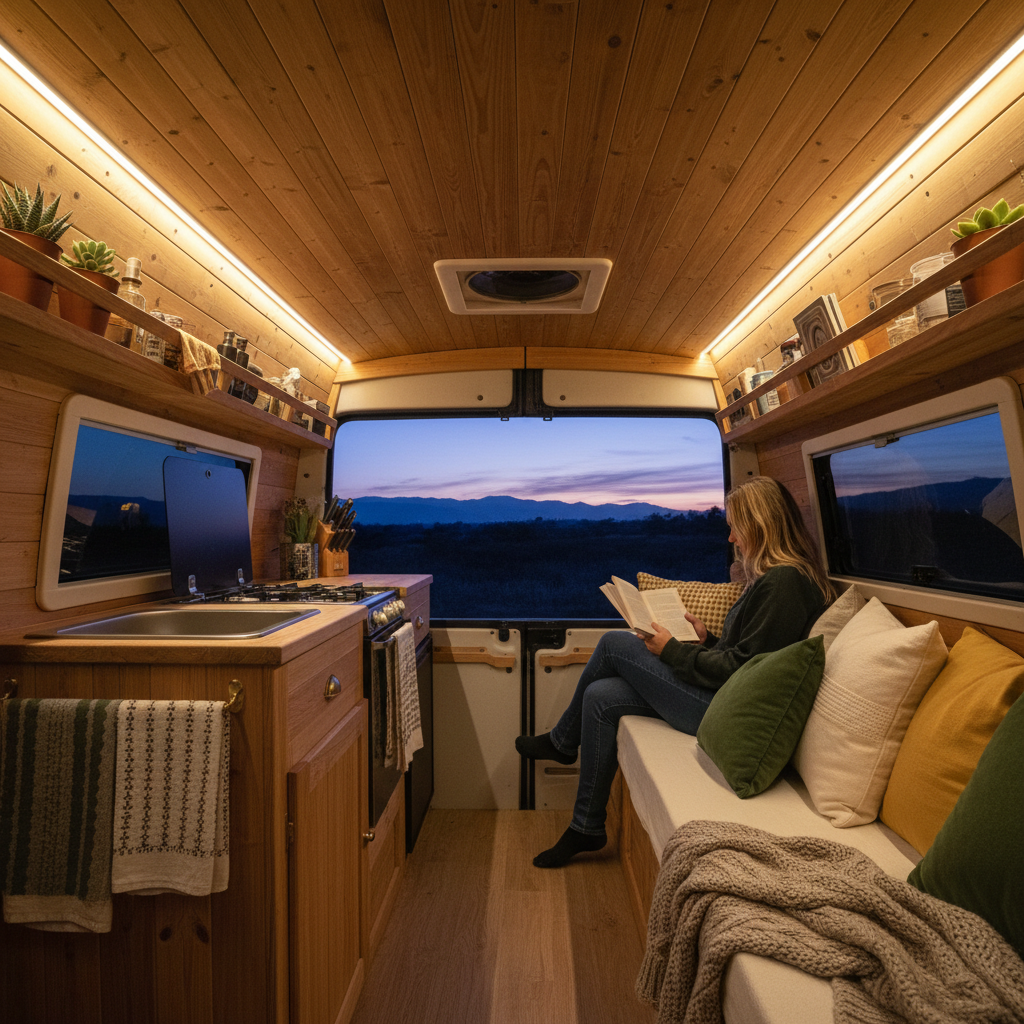
Warm white LEDs, typically rated between 2700K and 3000K, are the starting point for a cozy van interior. That range mimics incandescent light closely enough that the space feels intentional rather than improvised. Strips rated above 4000K push into daylight territory and are genuinely uncomfortable for evening use in a small enclosed space.
Or rather: color temperature alone doesn't tell the whole story. A 2700K strip with a CRI below 80 can still look washed out and unflattering because it renders colors poorly, making wood tones look flat and food look unappetizing. For van living, a CRI of 90 or above is worth prioritizing, particularly for the main overhead run.
Tunable white strips, which let you shift between warm and cool on a single channel, cost more but solve a real problem. During the day, bumping to 4000K helps with reading and close work. After dark, dialing back to 2700K shifts the mood quickly. Brands like Govee and Waveform Lighting both offer tunable strips with solid CRI specs, though Waveform's high-CRI options are aimed more at stationary installs and may need a voltage regulator to run cleanly off a 12V system.
RGB strips are a different product category. They're genuinely fun for accent lighting behind a bed frame or under a cabinet, but their white output is poor: an RGB strip producing white mixes red, green, and blue LEDs, which gives a low CRI that's noticeably ugly for task lighting. RGBW strips add a dedicated white LED channel and fix this problem at a small cost premium. If you want color-changing capability without sacrificing white quality, RGBW is the only format worth considering.
Power Draw and Your Battery Bank: The Math That Actually Matters
A standard 5-meter roll of LED strip at 12V pulls somewhere between 12W and 36W depending on density and LED type, so the range matters. A 14.4W strip running 5 hours a night draws 6Ah from your battery. Run two zones at 36W each and that same 5-hour evening costs 30Ah, which is 30% of a 100Ah battery before you've powered anything else. That number is derived from basic load calculation, not a manufacturer's optimistic spec sheet.
A common guideline among van builders is to budget no more than 20% of usable battery capacity for lighting across a full evening. On a 100Ah lithium battery with 80% usable capacity, that's 16Ah for lighting. Two zones of efficient warm white strip at around 8W each hit that ceiling comfortably at 5 hours. Two zones of dense RGBW at full brightness blow past it.
Dimmers change the equation meaningfully. A good PWM dimmer running strips at 40% brightness doesn't just feel softer; it cuts draw proportionally, which is one of the more useful levers you have. But not every strip is dimmer-compatible. If a strip's driver circuitry isn't designed for PWM, you get flicker at low settings, sometimes visible, sometimes just subtly headache-inducing. Check the manufacturer's spec sheet for PWM compatibility before buying, not after.
So if you ignore the power math entirely and just install whatever looks good, the consequence is predictable: you run your battery into low-voltage cutoff territory earlier than planned, your inverter shuts down, and you're troubleshooting at 10 PM instead of relaxing. That's not a hypothetical.
Installation: Where Lights Go Matters More Than Which Lights You Buy
Placement determines whether your van feels like a cabin or a grocery store. The single most effective move is indirect lighting: mounting strips behind a valance, under a loft bed frame, or along the top of cabinet faces so the light source itself is hidden and only the wash hits the walls and ceiling. Direct-overhead strip lighting with no diffusion is a waste of money regardless of how good the strip is.
I'd start with one continuous run along the ceiling perimeter, mounted behind a thin wood batten or aluminum channel with a frosted diffuser cover. Aluminum channels do double duty as heat sinks, and for high-density strips running more than 5 hours a day, that matters: LED strips without adequate heat dissipation degrade faster, and color shift over time is one of the first signs.
For wiring, a dedicated 15A fused circuit from your battery bus is the clean approach. Run 16 AWG wire for runs under 10 feet; anything longer should step up to 14 AWG to keep voltage drop below 3%, which is the threshold where color and brightness start shifting noticeably. Solderless connectors are convenient but are also the most common failure point in van builds. Soldered connections at junction points, sealed with heat shrink, are more reliable for a vehicle that vibrates constantly.
Accent zones, the kind under the bed platform or behind the driver's seat, can run off a secondary circuit with their own dimmer. Keep them on a separate switch from your main overhead so you can kill the overhead at night without losing the ambient glow entirely. That two-zone setup costs maybe $30 more in wiring and saves you fumbling with a single switch every evening.
When LED Mood Lighting Is the Wrong Answer
LED strip lighting is the wrong primary solution in one specific situation: extremely tight power budgets combined with a need for real task lighting. If you're running a 50Ah battery with solar charging only and you actually need to read, prep food, and work at a table, a single efficient 12V puck light or two surface-mount fixtures with quality bulbs will serve you better than a mood-lighting scheme. Strip lights optimized for ambiance aren't task lights, and trying to make them do both usually means running them at full brightness, which kills the cozy effect and still doesn't match a dedicated fixture's output.
Van dwellers who move frequently and prioritize minimal setup also tend to find elaborate multi-zone lighting more hassle than it's worth. If you're breaking camp every two days, a simple plug-in 12V LED lantern with a warm bulb is a legitimate alternative that costs under $30, requires no wiring, and can be repositioned in seconds. It lacks the built-in polish of flush-mounted strip lighting, but polish isn't everyone's priority.
Pulling It Together: A Lighting Plan That Actually Works
The reframe worth holding onto: LED mood lighting in a van is a power infrastructure decision dressed up as a decor choice. Treat it as decor and you'll buy the wrong strips, wire them carelessly, and wonder why the vibe isn't landing.
Here's a working framework. Check color temperature (2700K to 3000K), CRI (90+), and PWM dimmer compatibility first, before price. For a 100Ah lithium setup, keep total lighting draw under 16Ah per evening across all zones. Use aluminum diffuser channels on any run longer than 3 feet. Wire zones separately so you have actual control.
And if you're comparing LED strip lighting against simpler 12V puck fixtures or a quality lantern setup, the strip wins on ambiance when installed well and loses on simplicity and flexibility. Know which one you're optimizing for before you buy anything.
Start with the ceiling run. Get that right, live with it for a week, then add accent zones. The builds that feel considered are usually the ones that were built in stages.