Van builders and RV retrofitters will tell you to audit your countertop before you buy a single organizer, and there's a real reason for that. The square footage in a camper kitchen is almost never the problem. How that space is divided is. A poorly configured 30-inch galley wastes more usable volume than a well-organized 22-inch one, and the gap compounds every time you're parked somewhere without a store nearby.
Tiny camper kitchen storage isn't one problem. It's three overlapping ones: vertical dead zones above work surfaces, door-panel voids that hold nothing, and under-sink cavities packed with a single large pot when they could hold six smaller items. Solve all three and you've effectively added the equivalent of a full cabinet row without cutting a single new hole.
The tension most rigs never resolve is this: the gear that makes camp cooking good (cast iron, a real cutting board, actual spices) is exactly what kills your weight budget and your counter space simultaneously. That trade-off doesn't disappear. But it does become manageable once you stop organizing around what you own and start organizing around how you cook.
Where Camper Kitchens Actually Lose Space
The failure isn't usually the cabinet you don't have. It's the cabinet you do have, used at maybe 40 percent of its real capacity. A standard overhead camper cabinet sits about 12 inches deep and 10 inches tall. Stack two 4-inch spice jars in there and you've burned the entire shelf for six items. The other 6 inches of height above those jars? Air.
Riser shelves fix this immediately. A two-tier bamboo or wire riser, the kind sold for desktop or pantry use, costs under $15 and converts one shelf layer into two. You're not adding storage so much as recovering what the original cabinetry assumed you wouldn't need. That framing matters because it changes what you buy: you don't need new furniture, you need infill.
Or rather: risers are the floor, not the ceiling. The bigger recovery comes from door panels and vertical wall runs. An over-the-door organizer rated for pantry doors (look for ones with at least a 1.5-inch lip so contents don't bounce free on rough roads) adds a column of pockets to every cabinet face. In a four-cabinet galley, that's potentially 20-plus accessible slots that previously contributed nothing.
Under the sink is its own category. Most campers shove a single large container in there and call it done. Pull that out, measure the actual cavity dimensions, and you'll almost always find room for a two-tier pull-out bin (roughly $20-$35 at most US home goods stores) that doubles usable depth. The drain pipe is the obstacle; bins with a notched rear panel work around it without modification.
Vertical Space: The Dimension Camper Kitchens Ignore
Ceiling height in a camper kitchen runs anywhere from 60 to 78 inches depending on the rig. The top 18 inches of that column almost never holds anything useful. That's not wasted space because it's hard to reach; it's wasted because nobody planned for it.
Magnetic knife strips deserve more credit than they get in small-kitchen circles. A 16-inch strip mounted at eye level on a tile or metal backsplash area holds six to eight knives and multi-tools, frees an entire drawer, and keeps blades accessible without a block eating counter real estate. Some campers worry about road vibration shaking items loose; a strip rated for 10 lbs or more, with strong neodymium magnets, handles highway vibration without drama. This is one of those upgrades where skipping it doesn't just cost you storage. You end up with knives loose in a drawer, nicking each other and your fingers.
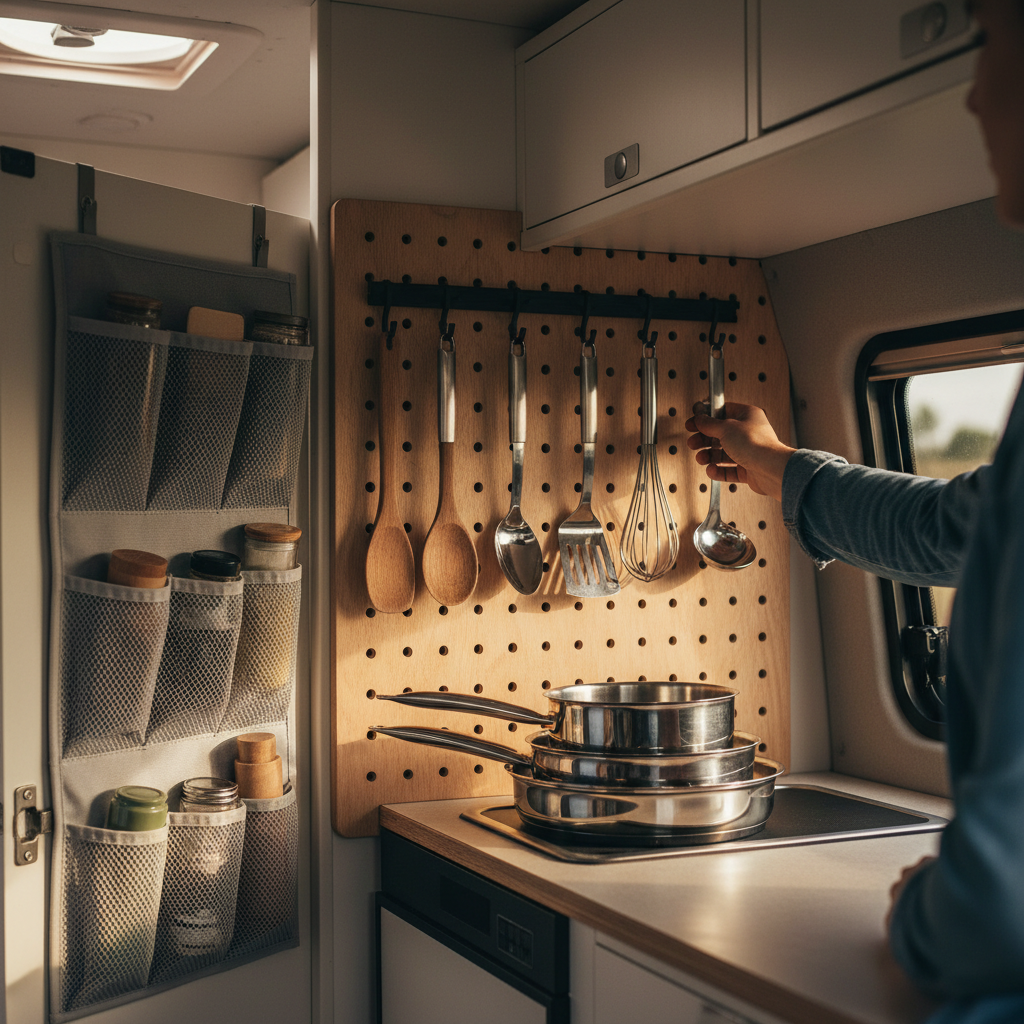
Pegboards and slotted wall panels (the kind used in small home offices and garage walls) translate directly to camper use. A 12-by-24-inch section of pegboard mounted on a side wall, secured with hex bolts so it doesn't rattle, takes hooks, small shelves, and spice rails. The modular part matters: you rearrange the hooks for a weekend trip versus a two-week run without permanent changes. I'd start with a pegboard layout rather than fixed hooks because what you think you need in week one is rarely what you need in month three.
Tension rods, often mentioned and rarely used correctly, work best spanning the interior of a deep cabinet to create a vertical file for cutting boards, baking sheets, and flat pan lids. Horizontal storage of flat items is a pain; vertical filing lets you pull one item without disturbing everything else. Two tension rods, about $4 total, solve a problem that drives campers to abandon flat cookware entirely.
The Gear You're Storing Wrong (and What to Do Instead)
Nesting cookware is the single most space-efficient change most camper kitchens can make, and most rigs are still running a mismatched stack of pots from a previous life. A four-piece nesting set collapses to roughly the footprint of one medium pot. Brands like GSI Outdoors and Stanley make sets designed specifically for camp use, with folding handles and lids that double as plates or pans. The space math is decisive: a traditional three-pot stack occupies around 1,200 cubic inches; a comparable nesting set occupies closer to 300.
That understates it. The real gain isn't just the cubic inches. It's that a nesting set fits in spots a conventional stack never could: a narrow cabinet end, a tote bag under a bench seat, a cubby that would otherwise hold air. The storage geometry changes, not just the volume.
Spice management deserves a specific system, not a general nod. Magnetic spice tins mounted on a refrigerator side or metal panel keep 12 to 15 spices accessible without occupying any shelf or drawer space. Tins in the 2-oz size (standard for most camp spice kits) hold enough for a two-week trip for two people. The alternative, a traditional rack sitting on a shelf, makes every spice retrieval a game of musical chairs in a space where you can't afford that friction.
Buyers skip collapsible gear until they're burned by the alternative. Collapsible colanders, measuring cups, and mixing bowls fold to under an inch of depth. Full-sized versions of those three items can consume 400-plus cubic inches of cabinet space. Collapsible versions from silicone brands like Prepworks or Reditainer are widely available at Target, Walmart, and Amazon for $8-$18 per item. None of this requires a specialty outdoor retailer.
When the Standard Advice Fails
Everything above assumes a conventional camper kitchen: cabinets, a countertop run, a sink with cabinet below. Full-time van dwellers and micro-camper owners often have none of that. If your kitchen is a two-burner stove on a plywood shelf with open storage below, magnetic strips and over-door organizers don't apply the same way. Organize around open storage principles instead: labeled bins, a fabric hanging organizer, and a dedicated "cook kit" container that travels as a unit rather than items scattered across the rig.
The other situation where standard storage advice weakens is high-mileage travel on rough roads. Everything discussed here assumes you're parking and staying put for at least a day or two. If you're moving camp daily on dirt roads, items in open pegboard hooks, magnetic strips, and riser shelves will migrate, tip, or bounce loose. For that use case, closed cabinet storage with positive latches, items secured in containers rather than freestanding, and tension rods replaced by fixed dividers are the more durable choices. The convenience trade-off is real.
This article is not for people fitting out a full Class A or Class C motorhome kitchen. Those rigs have enough cabinet space that different priorities apply entirely. The hacks here are sized for vans, truck campers, pop-ups, and teardrop trailers where the entire kitchen footprint is under 20 square feet.
A Practical System for a Camper Kitchen Under 20 Square Feet
Think of a camper kitchen as having four zones: prep, cook, store, and clean. Every item you own should belong to exactly one zone, and each zone should have a home before you load a single thing. Zone-based loading is the organizing principle; the specific products are just hardware.
The quick-reference below reflects a realistic baseline for a solo or two-person camper rig:
Camper Kitchen Zone Map (under 20 sq ft)
| Zone | Primary Storage Method | Estimated Cost | Space Recovered |
|---|---|---|---|
| Prep | Tension rod vertical file for boards and lids | $4-$8 | Medium cabinet, fully reclaimed |
| Cook | Nesting 4-piece cookware set | $35-$80 | 900+ cubic inches |
| Store | Riser shelf + over-door organizer | $15-$30 | Doubles shelf capacity |
| Clean | Under-sink pull-out bin (notched rear) | $20-$35 | Full cavity depth |
The cost column above reflects typical US retail pricing at home goods and general merchandise stores; actual prices vary by retailer and region. The space recovery figures are practical estimates, not manufacturer specifications.
Prioritize the cook zone first. A nesting cookware swap recovers more usable volume than any other single change, and it compounds: the freed space can absorb the items that were previously crammed into other zones. Prep zone next, because vertical filing for flat items costs almost nothing and removes daily friction. Spice storage and door panels can follow once you see what space actually remains.
Start with what creates the most daily frustration, not what looks best in a photo. Camper kitchens get messy fast and recover fast. The system that gets reset in two minutes wins over the one that looks great on day one.