Van builders will tell you to think about weight distribution before they discuss shelving, drawer slides, or any storage product, and there's a reason for that. The physics of a moving vehicle make every loose object a hazard, and camper van organization isn't really about tidiness. It's about keeping your gear, your build, and your safety intact across mountain switchbacks, highway on-ramps, and rutted forest roads.
Organizing a small camper van so nothing slides comes down to three overlapping problems: where things are anchored, what they're anchored with, and how the cabinet system behind them is built. Get any one of those wrong and the other two can't compensate.
The tension that most van owners don't resolve until something breaks: the same storage solution that works perfectly at highway speed on flat interstate absolutely fails on a dirt road at 25 mph. Lateral forces and vertical bounce are different problems, and most off-the-shelf organizers address only one of them.
Why Stuff Slides: The Actual Mechanics
Before fixing anything, it helps to understand what's generating the movement. A vehicle cornering at moderate speed creates lateral G-forces that can run well above 0.3g on anything secured only by friction. Vertical impact from road imperfections compounds that. A loose cast-iron pan on a flat shelf is sitting at roughly its own weight of static friction; a pothole removes that friction entirely for a fraction of a second. That's enough to reset its position by several inches on every bump.
Or rather: friction isn't the right concept at all. The goal is positive retention, where an object physically cannot move rather than merely tends not to. That distinction drives every product recommendation below.
Two categories of motion need different solutions. Lateral sliding (side-to-side) is best stopped by vertical dividers, drawer slides with positive stops, and lips on shelves. Vertical bounce (gear lifting off a surface and landing elsewhere) needs compression: bungee nets, tension straps, or closed cabinet doors with positive latches. Targeting only one category leaves you with something held sideways but bouncing loose, or held down but sliding forward into the cab every time you brake hard.
This article focuses on permanent and semi-permanent interior organization for van conversions. It doesn't cover roof rack cargo management or motorhome-specific systems, which follow different structural rules.
The Foundation: Cabinet and Shelf Design That Prevents Movement
Shelf lips are the baseline. A bare flat shelf with no edge retention is a failure waiting to happen, and retrofitting lips after a build is tedious. The practical minimum for a shelf lip in a moving vehicle is around 1.5 inches for lightweight items, 2 to 3 inches for heavier kitchenware. A common guideline in van conversion communities is to size lips at roughly 15 to 20 percent of the tallest item stored on that shelf. That's not an official standard; it's a heuristic worth labeling as one.
Beyond lips, consider the geometry. Angled shelves (sloping back at 5 to 10 degrees toward the van wall) use gravity to keep contents pressed against the back wall rather than tumbling toward the aisle. This works well for pantry items and bottles. It's less useful for flat items like cutting boards or baking trays, which need vertical slots instead.
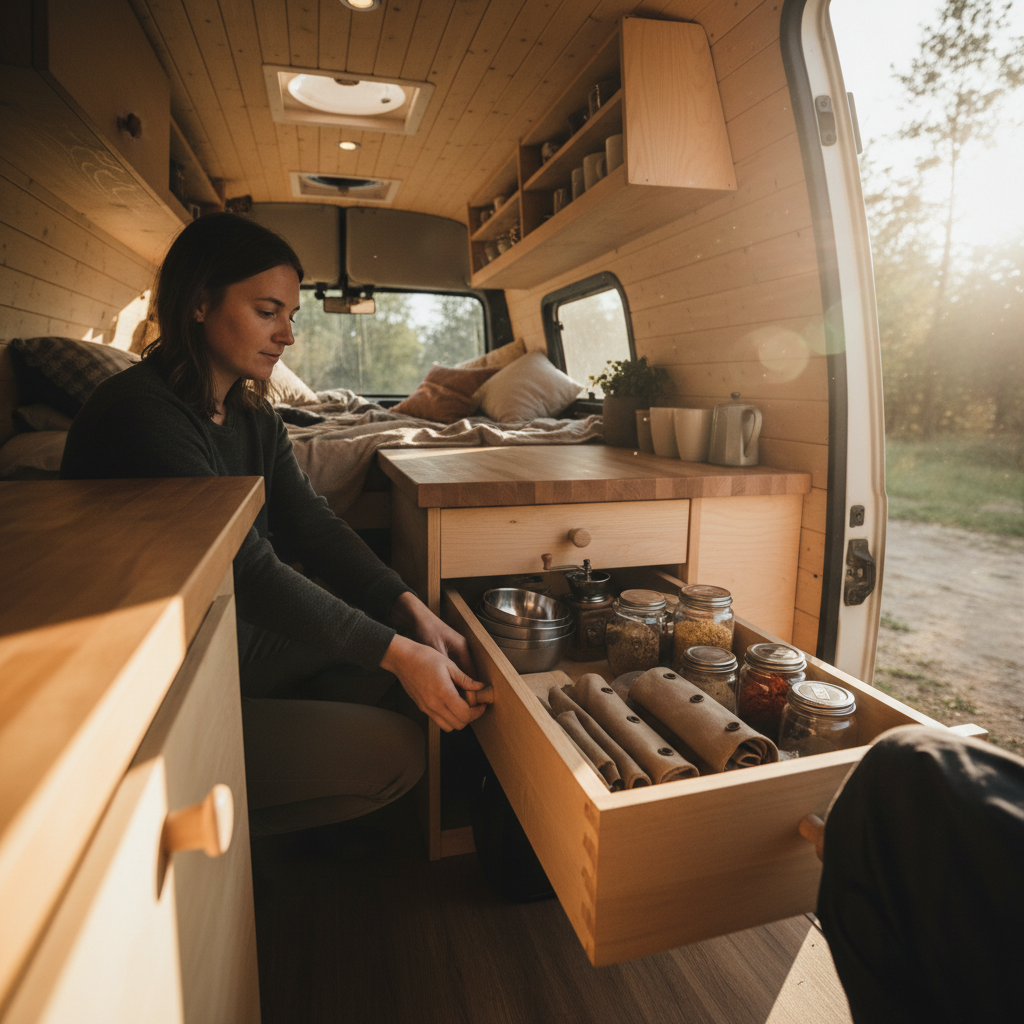
Drawer slides are the most reliable solution for kitchen gear. Full-extension ball-bearing drawer slides lock in both the open and closed positions, which means the drawer can't rattle in transit or fly open on a downhill grade. Undermount slides (hidden beneath the drawer box) allow a full-width interior without slide intrusion. A drawer for your heaviest items, mounted low in the build, also keeps your center of gravity down, which matters more than most first-time builders expect.
Cabinet door latches deserve more attention than they get. Two-point draw latches, the kind used on toolboxes and pelican cases, create positive retention that a simple magnetic catch can't match at speed. For upper cabinets in particular, a cabinet that pops open on a rough road dumps its contents directly onto cooking surfaces or sleeping areas. Two-point latches run a few dollars each and prevent exactly that.
Retention Hardware: What Actually Works at Speed
The van conversion market in the US has expanded enough that purpose-built retention hardware is now available without resorting to marine or aircraft suppliers, though both of those industries solved this problem decades before van life became a mainstream pursuit.
Bungee cord nets are the most versatile retention layer. Stretched across an open shelf bay, they hold items of irregular shape that rigid dividers can't contain. The practical limit is around 5 to 6 pounds per net section before elastic stretch becomes excessive under load. For heavier items, ratchet straps with soft loops prevent surface damage while providing the compression that bungee lacks at higher weights.
Non-slip shelf liner (Dycem is the most widely cited brand among occupational therapists and adaptive equipment specialists, and it works identically in vans) adds meaningful friction even before you add any other retention. It's not a substitute for lips or latches, but layering it under every shelf reduces the initial sliding distance enough to matter when a lip is your only other defense.
For loose items on countertops and work surfaces, cup holders and utensil dividers with rubber-lined slots outperform any open container. The rubber compresses against the item and creates lateral grip independent of gravity. Open plastic bins, by contrast, hold their contents relative to the bin but allow the bin itself to travel, which is just moving the problem one level up.
What you'll notice when you start using this hardware together is that the items most likely to cause damage aren't the heaviest ones. A cast-iron skillet sitting in a low drawer with a positive-stop slide won't move. A loose glass bottle on a rubber-lined shelf with a 2-inch lip is also fine. The real culprits are mid-weight objects on surfaces designed for a different category, such as a heavy cutting board on a shelf meant for spice jars, or a full water jug wedged into a net designed for soft items.
Zone-by-Zone Organization: Placing the Right Things in the Right Places
Weight placement changes how the van handles. Heavy items belong over the axles and as low as possible. Fresh water tanks, battery banks, and tool storage work best at floor level in the middle third of the van. Placing a 40-pound water jug in a high cabinet at the rear creates a pendulum effect in corners that even good driver technique can't fully cancel.
The kitchen zone is where most sliding happens because it combines frequent access with the most varied object shapes. I'd start the kitchen layout with a committed drawer system for anything heavy (cast iron, pots, full canisters) before deciding where anything else goes. Shelves above the counter should hold only lightweight, rarely-moved items. Frequently used small items, spices, cooking tools, condiment bottles, live better in a pull-out drawer or a door-mounted organizer where they're positively retained behind a latch.
The sleeping and living zone doesn't slide as much, but unsecured gear under a platform bed is a common source of rattling. Slide-out drawers or rigid bins with lids eliminate almost all of that. Soft storage, duffel bags or stuff sacks, compresses into irregular shapes that fill gaps but don't create rigid rattling contact points. They're a good complement to hard-sided bins, not a replacement.
The cab-adjacent area (behind the front seats) is under the highest braking stress. This is the worst place to store anything heavy that isn't positively retained. A heavy cooler sliding forward into the back of the front seats under hard braking isn't just a nuisance. It's a safety problem. Coolers in this position need a dedicated floor latch or a mounted cargo strap anchored to a structural point, not to cabinet wood.
The table below summarizes which retention methods work best by zone and load type.
| Zone | Typical Load | Primary Retention | Secondary Retention |
|---|---|---|---|
| Kitchen drawers | Heavy (pots, iron, canisters) | Ball-bearing drawer slides with stops | Drawer dividers |
| Kitchen shelves | Light (spices, dry goods) | Shelf lips + non-slip liner | Bungee net across front |
| Upper cabinets | Variable (gear, clothing) | Two-point draw latches | Internal dividers or stuff sacks |
| Under-bed storage | Variable (tools, bins) | Slide-out drawers or lidded bins | Soft packing around hard items |
| Cab-adjacent floor | Heavy (cooler, water) | Floor anchor or cargo strap to structure | Non-slip mat |
The zone approach matters because no single retention method is appropriate for every area. Applying bungee nets everywhere costs you easy access; latching every surface adds friction to daily use. Matching retention strength to braking and cornering stress by zone gets you a build that's both secure and functional to live in.
When the Standard Advice Breaks Down
The usual recommendation, which is to build a full cabinet system with plywood boxes, drawer slides, and locking latches, works well for van owners who do mostly road travel and stay on pavement or maintained dirt roads. For overlanders running technical four-wheel-drive terrain, that advice is incomplete at best.
High-angle articulation and sustained vibration on rocky trails introduce vertical and torsional forces that flat-road van builds don't encounter. Cabinet boxes built from 3/4-inch plywood with standard pocket screws can work loose at joints over dozens of hours of trail use. The failure mode is subtle: joints loosen slightly, which increases cabinet flex, which fatigues fasteners further. The first sign is usually a drawer that no longer closes flush. By the time you notice, several screws have already pulled.
For overlanding-specific builds, two adjustments matter. First, use structural adhesive (construction adhesive or epoxy) at all joints in addition to mechanical fasteners. Second, use through-bolts rather than pocket screws at primary corner joints. These approaches are standard in marine cabinetry for exactly the same reason: sustained vibration in a dynamic environment. If you're doing soft-road travel a few times a year, standard construction is fine. If overlanding is the point of the build, treat it like a boat.
The other edge case is extended use in extreme cold. Drawer slides with plastic components can become sluggish or seize below 20°F. All-metal ball-bearing slides maintain their action in cold; slides with nylon rollers don't. This matters in the Rocky Mountain West, the Upper Midwest, and the Pacific Northwest during winter use.
Locking It All Down
Start with the heaviest items and work outward. Anchor the cooler or water storage first, using a floor latch or structural cargo strap, before building anything around it. Then address kitchen drawers. Then upper cabinets. Then loose items on surfaces last.
If you do nothing else, get these three things in place before your next trip: two-point draw latches on every upper cabinet door, full-extension ball-bearing drawer slides on any drawer holding items over 3 pounds, and a 2-inch shelf lip or bungee net on every open shelf. That combination stops roughly 90 percent of the movement problems van owners report, even without a purpose-built cabinet system.
Skip the retention hardware and you're not just dealing with inconvenience. Sliding gear damages cabinet interiors, breaks equipment, and creates noise fatigue on long drives that genuinely erodes the experience. A cast-iron pan loose in a cabinet for 500 miles of highway will sand through a plywood floor within a season.
The build that holds everything solid isn't the most elaborately organized one. It's the one where every object has a category, every category has a dedicated retention method, and the retention method is matched to the forces that location actually experiences.