


Veteran van builders will tell you to solve sleeping and cooking before you touch clothing storage, and there's a reason for that. Clothes in a camper van without a closet aren't just a tidiness problem. They're a spatial negotiation you lose every time you treat them like an afterthought.
The decisions that actually matter here are build depth, trip length, and humidity management. Get one wrong and you end up with mildew in a compression bag or a wardrobe system that eats the floor space your dogs or your gear desperately needed.
This guide won't help you recreate a bedroom closet on wheels. That's not the goal and it's not realistic. What it will do is show you how to make clothing storage genuinely invisible in a van build, so it doesn't compete with everything else you care about.
The tension most van dwellers don't expect: the system that works perfectly for a two-week road trip completely fails a full-time liveaboard, and the failure usually shows up around week three when damp clothes have nowhere to go.
Why Closet Thinking Gets Van Dwellers in Trouble
The single most common mistake is importing home storage logic into a 60- to 80-square-foot space. A hanging rod feels intuitive because it's what you grew up with. But hanging clothes in a van requires 20 to 24 inches of clearance depth, and that depth is almost always borrowed from bed width, walkway clearance, or countertop overhang. You feel that loss every single day.
Or rather: the problem isn't hanging storage itself. It's uncompressed hanging storage for items that don't need it. Three dress shirts and a rain jacket justify a short hanging section. Fourteen t-shirts do not.
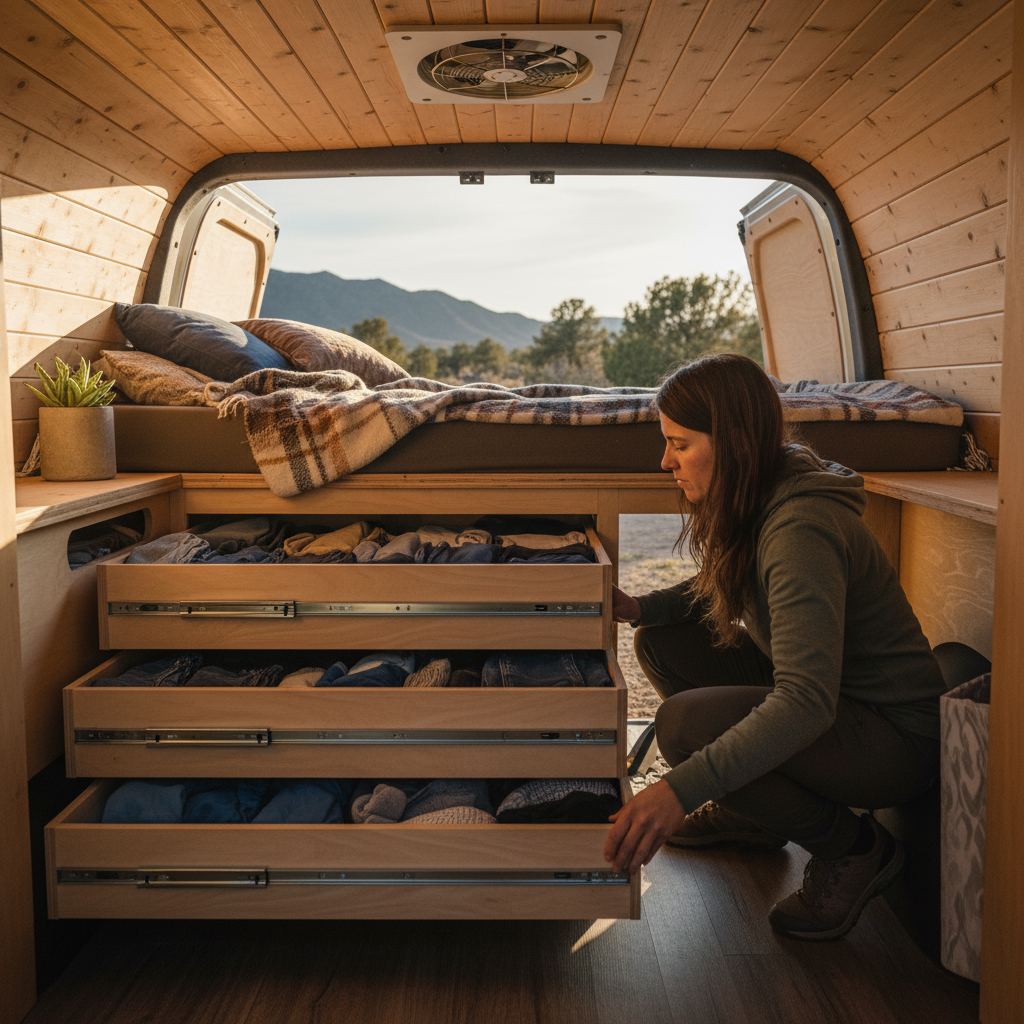
The alternative most builds default to is stacked drawers under the bed platform, and this works well until you can't find anything without pulling everything out. Shallow drawers solve that. A drawer 4 to 5 inches deep holds folded t-shirts, underwear, and socks in a single visible layer, so you see everything at a glance without digging. Builders who use 8-inch drawers to save build complexity almost always regret it by month two.
And full-time van dwellers tend to carry fewer clothes than they expect to need. A realistic full-time wardrobe fits in about 10 to 14 garments per person for most climates, which changes the math on how much dedicated storage you actually need to build.
The Three Storage Systems That Actually Work
Before committing to a build approach, check three things: your van's interior height, whether you cook inside (humidity matters), and how often you access your full wardrobe versus a daily subset. Those three variables determine which system earns its square footage.
Under-bed drawers with face-pull hardware are the workhorse of most serious van builds. A full-width under-bed drawer running 48 to 54 inches across a standard cargo van gives you roughly 8 to 10 cubic feet of usable volume at 4 to 5 inches of drawer depth. That's enough for two people's daily clothing in most three-season conditions. The key is face-pull handles (recessed or flush-mount) that don't catch bags or knees when the drawer is closed. Drawer slides rated for 75 to 100 pounds matter more than most builders expect, because the drawer will hold more than clothes within six months.
Overhead cabinet runs work well in high-roof vans where you have 6 feet 4 inches or more of standing height. A 12-inch-deep overhead cabinet running the length of one wall holds seasonal items, compression-packed extras, and anything you access less than once a week. In standard-roof vans, overhead storage competes aggressively with headroom and almost never wins that fight.
Soft-side collapsible cubes in a dedicated nook are the underrated option for part-time van users. IKEA SKUBB boxes (roughly $15 for a set of six) fit inside almost any cabinet shell and let you pull one cube at a time without disturbing the rest. They're not a permanent solution for full-timers because the fabric degrades with humidity, but for weekend-to-two-week trips they're genuinely hard to beat for the cost.
A short hanging section is worth including if you travel for work or events, but cap it at 18 inches of rod length and use slim velvet hangers, not the plastic ones that double the garment stack. That 18-inch section handles 6 to 8 garments without meaningful spatial sacrifice.
Humidity Is the Problem Nobody Mentions Until It's Too Late
Cooking inside a van produces a surprising amount of moisture. So does sleeping. A couple sleeping in a sealed van generates roughly a liter of water vapor per night through respiration alone, and that moisture has to go somewhere. Without active ventilation, it condenses on cold surfaces, including clothes stored near exterior walls or in poorly sealed cabinets.
The practical fix is two-part: a roof vent fan (the Maxxair 00-07500K or the Fan-Tastic 1200 series are the standard references in the van conversion community) running on low exhaust while cooking and sleeping, and cedar blocks or silica gel packets inside any enclosed clothing storage. Cedar doesn't absorb moisture, it discourages mildew; silica packets actually pull moisture from the air. Use both.
Clothes stored directly against an uninsulated exterior wall in cold weather will pick up condensation even with good ventilation. A half-inch air gap between cabinet back panels and the van wall makes a measurable difference. Most DIY builds skip this step because it complicates the cabinet install, and most builders who skip it spend a confused week wondering why their clothes smell musty.
If you cook frequently inside, pack wool and synthetic performance fabrics over cotton. Cotton holds moisture and dries slowly in a humid van environment. This isn't a storage hack; it's a wardrobe edit that makes your storage system work better by default.
When the Main Approach Fails: Full-Timers in Wet Climates
Under-bed drawers and overhead cabinets assume a relatively stable humidity environment. Full-time van dwellers in the Pacific Northwest, coastal New England, or anywhere with sustained precipitation face a different problem: wet gear coming back into the van repeatedly, and no good place to stage damp clothes before they're fully dry.
The standard build advice breaks down here. Sealed drawers trap moisture against fabric. Overhead cabinets concentrate the warmest, most humid air in the van at ceiling level, which is exactly where you don't want damp wool.
What works instead is a dedicated wet-staging zone: a ventilated cabinet shell (wire mesh or slatted wood back panel instead of solid sheet) positioned near the van door, away from the sleeping area. Clothes go in damp, air circulates, and nothing sealed traps the moisture. This costs roughly 4 to 6 cubic feet of interior volume, which is a real sacrifice. But if you ignore wet-climate staging and just use standard drawer storage, you'll be pulling mildewed gear out of your build by month four. That's not a hypothetical; it's the single most common complaint in full-time van dwelling communities with wet-climate members.
This section of the guide doesn't apply to you if you van-camp in arid climates or take mostly short trips. Standard sealed drawer builds are fine for the Southwest, the Great Basin, and dry-season routes in the Southeast.
Making It Work: A Practical Build Decision
I'd start with the under-bed drawer system before committing to anything else, because it's the one element almost every van build benefits from regardless of trip style. Build it with 4-inch drawer depth, full-extension slides, and flush hardware. Everything else, including overhead cabinets, hanging sections, and soft cubes, layers onto that foundation based on how you actually live in the van after the first month.
The reframe that changes how most people approach this: clothing storage in a van isn't a fixed system you build once. It's the category you deliberately compress so every other system in the van can breathe. The builders who obsess over wardrobe square footage usually end up cramped everywhere else.
Here's what the decision actually turns on: trip length, climate, and whether you cook inside. Short dry trips: collapsible cubes and a small hanging section. Full-time in variable climates: shallow under-bed drawers plus a ventilated wet-staging zone near the door. Full-time in dry climates: under-bed drawers with an overhead run for seasonal gear, and you're done.
If you skip moisture management entirely and rely on sealed storage in any climate with real weather, expect to replace or air out gear within a season. The storage system isn't the problem at that point; the missing ventilation is. Build the vent fan into the budget before you build the drawers.
Quick-Reference: Clothing Storage by Van Use Type
Use this summary to match your build approach to how you actually use the van. These are practical guidelines based on how the van conversion community has converged on these systems, not manufacturer specifications.
| Use Type | Primary Storage | Wet Staging Needed | Hanging Section |
|---|---|---|---|
| Weekend trips, dry climate | Collapsible cubes in cabinet nook | No | Optional, 12 inches max |
| 2 - 4 week trips, variable climate | Under-bed drawers, 4 - 5 inch depth | No (ventilate van instead) | Yes, 18 inches max |
| Full-time, dry climate | Under-bed drawers + overhead run | No | Yes, 18 inches max |
| Full-time, wet climate | Under-bed drawers + ventilated wet zone | Yes, near door | Minimal or none |
The hanging section column above assumes a standard-roof van. High-roof van owners have more flexibility, but the 18-inch cap still applies unless work or formal travel is a regular part of your life on the road.
The Simplest Version of This Decision
Build 4-inch under-bed drawers with full-extension slides first. Install a roof vent fan. Edit your wardrobe to roughly 12 garments per person before you build anything else. Those three moves solve 80 percent of clothing storage problems in a van conversion before you've bought a single storage bin.
Add a ventilated wet-staging nook if you live in a rainy climate full-time. Add an 18-inch hanging section if you need it for work or events. Add overhead cabinets only if your van has the headroom and your wardrobe genuinely needs the volume after living in the build for a month.
The worst version of this problem is building elaborate storage before you know how you actually live in the van. Spend the first month with collapsible cubes and a laundry bag. You'll learn more about your real storage needs from four weeks of actual use than from six months of planning.